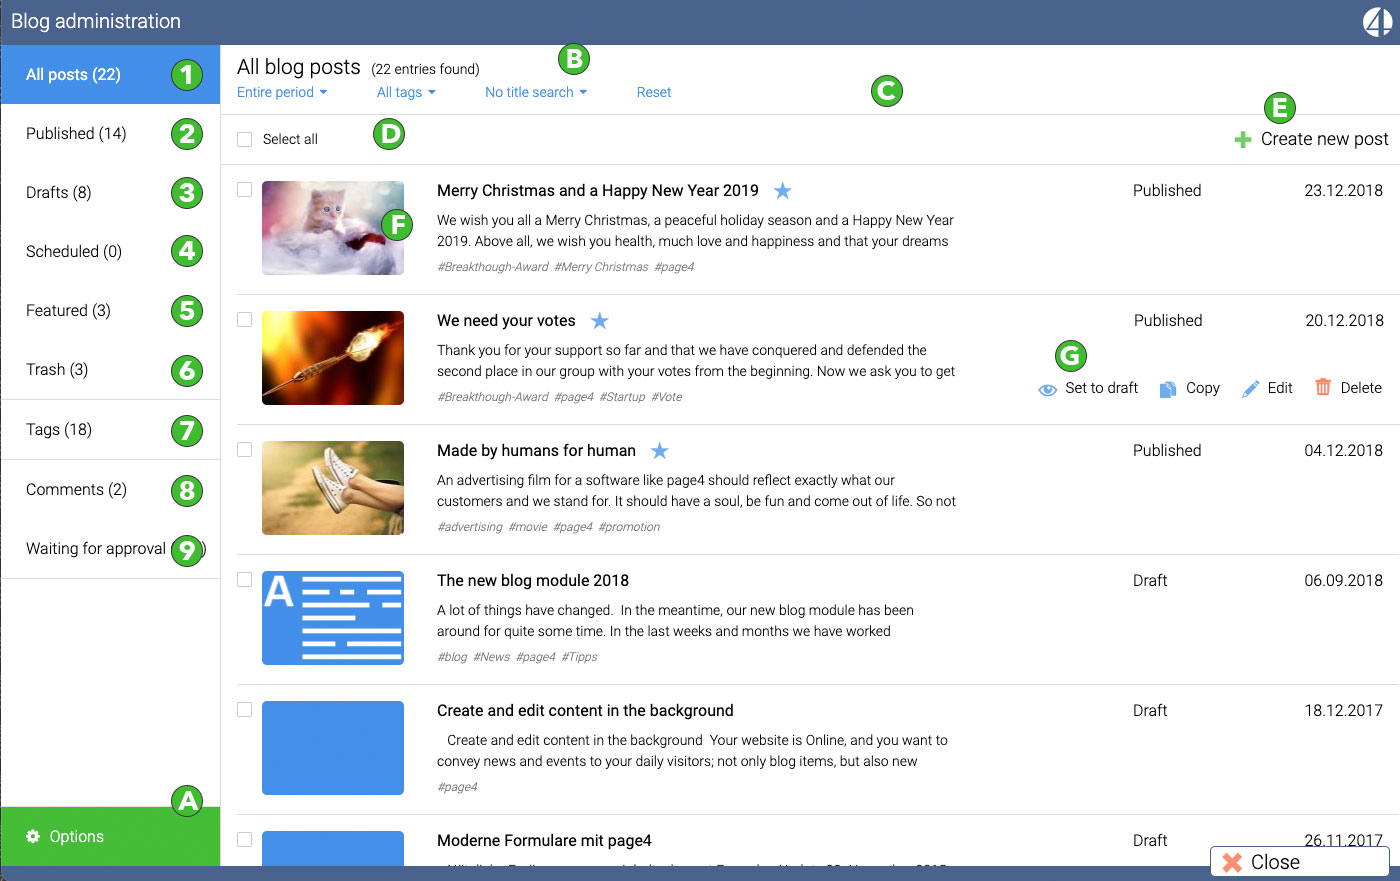
With the new version of our blog module, all the work related to your blog is coordinated in one administration window. The window is divided into different areas and adapts to your screen or browser window.
On the left you will find a variety of "drawers" in which articles, comments and keywords are stored. In the middle, existing articles are displayed according to certain criteria. To the right of each article are various options and above the article list you have the functions to filter your articles.
If you want to edit an existing article, you can simply open the article with a double click or use the corresponding icons on the right.

1) If you click on it, all entries are displayed on the right, regardless of type. That means drafts, plans and published articles. If you have written more than 200 articles, only the 200 newest articles are displayed. You can then restrict the time window in the upper right corner (B). For example, you could specify to show only all articles that are from 2015 or from April 2016.
2) Here are all published articles, that is, all those that are visible to your visitors.
3) All drafts are collected here. Every new article is a draft for now. The date does not matter.
4) Planned articles are all those that are published but have a date in the future. These will be published automatically by the system when the date is reached and therefore visible.
5) You can mark articles as Recommended. Such articles will be placed here.
6) All deleted articles end up in the recycle bin. You can get them out of the recycle bin at any time. Only when you empty the recycle bin, the articles in it will be irrevocably deleted.
7) All tags you created will be listed here.
8) All comments in the "Comments" section are approved comments.
9) All comments that you have not yet unlocked are listed here. This folder fills up when you want to moderate comments.
A) In the options section are all the settings for the blog. Click on this entry and a window opens where you have access to all parameters for the blog. Here you can activate the blog, determine which navigation should be displayed, which template is used and much more.
B) Above the articles there is an information line that updates automatically.
C) Here you can limit the articles to be displayed. You can search for a certain time frame, for keywords and in the title of an article. With "Reset" all articles are displayed again and the search is deleted.
D) Here you can select all articles and then edit them together.
E) With a click on "Create new entry" an empty article is created and you change into the edit mode.
F) Always the first found picture in the article is shown here as a preview. If there is no image available, a graphic provided by us will be displayed. If you deposit an image for the teaser, this image will be displayed.
G) If you go with the mouse over an entry, editing tools appear in the form of icons - you can then publish an article with it or set it back to draft. Edit it or delete or copy it.
Hints:
By double-clicking on the article you can open the text editor.
A deleted article will be moved to the recycle bin and will remain available as long as the recycle bin is not emptied.
Each article has a selection box to the left of the preview. You can select several articles at the same time and then edit them, i.e. delete them, copy them, etc. At the top is a selection box "Select all". With this you can select all displayed articles with one click. Another click deletes the selection again.